As time goes on the protection of your own privacy with 3rd party companies becomes harder and harder. This is where software like Nextcloud comes in hand, as it gives you full control over your files with no 3rd party controller.
It is important to remember that since your data will be stored on your local network you will end up using a lot of bandwidth when uploading and downloading files from outside your local network. If your internet connection is not great then you may not get the best experience if you plan on using it outside your local network.
If this looks familiar then that’s because it likely is, Nextcloud is an actively maintained fork of the owncloud software that I have previously covered. The longer it’s in development the more different these two software packages will likely become, I suggest looking into both and then deciding on which one to go with.
If you want to learn more about Nextcloud, you can check out the nextcloud website.
Note: The USB ports on a Raspberry Pi are typically unable to power an external hard drive. If you find this the case and your hard drive doesn’t use an external power supply then I recommend looking into buying a powered USB hub for the Pi.
Equipment List
You can find all the bits and pieces that I used/recommend for this Raspberry Pi nextcloud tutorial right below.
Recommended
Raspberry Pi 2 or 3
Micro SD Card or a SD card if you’re using an old version of the Pi.
Ethernet Cord or Wifi dongle (Pi 3 has WiFi inbuilt)
External Hard drive or USB Drive
Optional
Installing Apache and PHP
To run Nextcloud on the Raspberry Pi we will first need to install and setup Apache and PHP.
We won’t be going too in-depth into installing these as they are a minor components to this tutorial.
If you want to learn more about setting up a Web Server, then be sure to follow our tutorial on how to do this.
For the best performance I recommend using Raspbian lite but just normal Raspbian will also work just as well.
If you need information on how to set this all up check out the guide in the Pi operating systems section.
For this tutorial, we will make use of the latest available version of PHP 7.
1. To get started let’s first update our package repositories with the following command:
sudo apt update
sudo apt upgrade
2. With that done, let’s now install apache with the following command:
sudo apt install apache2You can check to make sure Apache2 is successfully up and running by going to your Pi’s IP address, this should load a default Apache Page.
If you are unsure on what your Raspberry Pi’s local IP address is then type in hostname -I into the terminal.
3. With Apache2 now installed onto the Raspberry Pi we just need to install PHP and several of its packages.
For this tutorial we will be using PHP 7.3, this will require that you have Raspbian Buster installed.
You can upgrade to Raspbian buster by following our guide.
To install PHP and the packages we need, run the following command.
sudo apt install php7.3 php7.3-gd php7.3-sqlite3 php7.3-curl php7.3-zip php7.3-xml php7.3-mbstring php7.3-mysql php7.3-bz2 php7.3-intl php7.3-smbclient php7.3-imap php7.3-gmp4. With Apache and PHP now installed there is one final thing we need to do, and that is to restart Apache.
You can do this ny making use of the following command:
sudo service apache2 restart Setting up a MySQL Database and User for Nextcloud
In this section we will be showing you how to set up a user and database for Nextcloud to use to store its data.
Before beginning this section you must have set up a MySQL server on your Raspberry Pi already.
1. The first thing we need to do is open the MySQL command line tool by running the following command.
We will be using this command line tool to create a user and database for MySQL.
sudo mysql -u root -p2. Once you have logged in to the tool, we can start by creating a database.
We will be creating this database called nextclouddb by running the following command.
CREATE DATABASE nextclouddb;3. Our next step is to create a user that we will be using to interact with our new database.
We will be creating a user called nextclouduser by running the command below. Make sure that you replace [PASSWORD] with a secure password and make note of it for later.
CREATE USER 'nextclouduser'@'localhost' IDENTIFIED BY '[PASSWORD]';4. With our user created we need to now give it permissions to interact with our database.
We can do that by running the following command.
GRANT ALL PRIVILEGES ON nextclouddb.* TO 'nextclouduser'@'localhost';This command grants the user nextclouduser all privileges on the nextclouddb database and all of its tables.
5. Our final task is to flush the privilege table.
To flush the privileges all we need to do is run the following command.
FLUSH PRIVILEGES;With this done, we can now proceed to install Nextcloud on our Raspberry Pi.
Downloading Nextcloud on your Raspberry Pi
Getting Nextcloud on your the Raspberry Pi is quite simple, it mainly involves downloading the zip file from their website, extracting it and then making some .
1. To get started let’s first move to our html directory with the following command:
cd /var/www/2. Now we can download the latest version of Nextcloud to our device.
To do this we will use wget to download the latest release to the current folder.
sudo wget https://download.nextcloud.com/server/releases/latest.tar.bz23. With Nextcloud now downloaded to our Raspberry Pi, let us extract the archive.
To extract the archive using tar we need to use the command below.
sudo tar -xvf latest.tar.bz24.
We now need to create a data directory for Nextcloud to operate in, for
the initial setup of Nextcloud we must make this folder in our html/nextcloud directory.
Create the directory by using the following command:
sudo mkdir -p /var/www/nextcloud/data5. Now let’s give the correct user and group control over the entire Nextcloud folder and everything inside it by running the following command.
sudo chown -R www-data:www-data /var/www/nextcloud/6. Finally we need to give it the right permissions, again run the following command:
sudo chmod 750 /var/www/nextcloud/dataConfiguring Apache for Nextcloud
Next, we need to deal with the .htaccess file for Nextcloud.
Since we installed Nextcloud into the default Apache2 directory /var/www/, we will need to change some settings in Apache2 to allow the .htaccess file to override settings.
To handle this just for the Nextcloud directory we will be creating a new configuration file.
1. To get started let’s create a file which will store our configuration changes for Nextcloud:
sudo nano /etc/apache2/sites-available/nextcloud.conf2. Within this file enter the following lines.
Alias /nextcloud "/var/www/nextcloud/"

<Directory /var/www/nextcloud/>
  Require all granted
  AllowOverride All
  Options FollowSymLinks MultiViews

  <IfModule mod_dav.c>
    Dav off
  </IfModule>

</Directory>
These lines basically tell Apache2 how to handle itself within the /var/www/nextcloud/ folder.
These changes will allow Apache2 to read and utilize the .htaccess files within the Nextcloud directory.
3. Now we can save and quit out of the file by pressing CTRL + X then pressing Y and then ENTER.
4. With the file created we now need to tell Apache to make use of it.
We can do this by utilizing the a2ensite command followed by nextcloud.conf.
sudo a2ensite nextcloud.conf5. Now we need to restart Apache2 to force it to read in the updated configuration file. We can do that easily with the following command:
sudo systemctl reload apache2With that done you can now move on to setting up the Nextcloud software within its web interface.
Nextcloud Initial Setup
1. Now that we have finished with that we can now finally go to Nextcloud itself and begin its installation process.
To begin go to your Raspberry Pi’s IP address plus /nextcloud.
If you don’t know your Raspberry Pi’s IP address you can make use of the command hostname -I.
Remember to replace [IPADDRESS] with that of your Raspberry Pi’s.
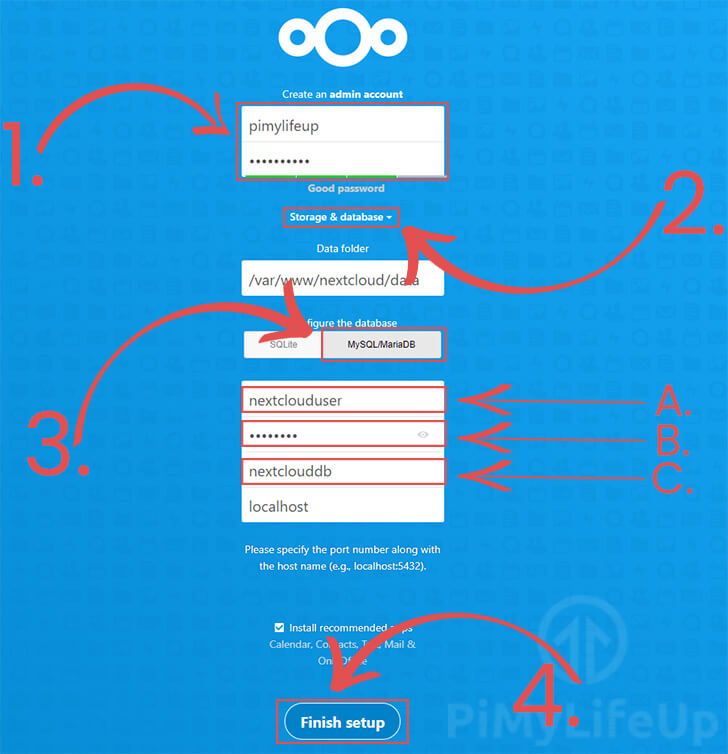
[IPADDRESS]/nextcloud2. You will now be greeted with the following screen.
Here you will need to type in the Username and Password (1.) that you intend to use for your admin account.
If you plan on allowing your Nextcloud file service to be accessible from outside your network, make sure that you use a long and secure password.
Next, we need to specify the details for our database server. To get to these options you will need to click the “Storage & Datbase” option (2.).
Now you need to slect the type of database we want to use. As we are using an SQL server click the “MySQL/MariaDB” (3.) option.
Finally we need to enter the details for our database server. There are three bits of information that we will need to enter.
- The username for the user that will interact with our database server. (A.) If you are using the same information we used, this setting should be set to
nextclouduser. - The password that you set for the above user. (B.)
- The final option you will need to set is the database name. (C.) If you have been following our guide this will be
nextclouddb.
Once you are happy with this, press the “Finish Setup” button (4.), please note this can take some time to complete as it finalises your setup.
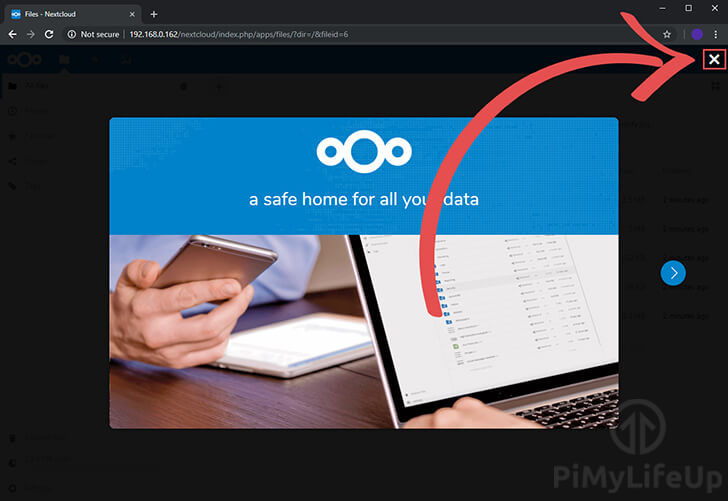
3. After this you should now be greeted with the following welcome screen, this just lays out the various programs you can use to connect with your Nextcloud installation.
Just click the X button in the top right corner to continue.
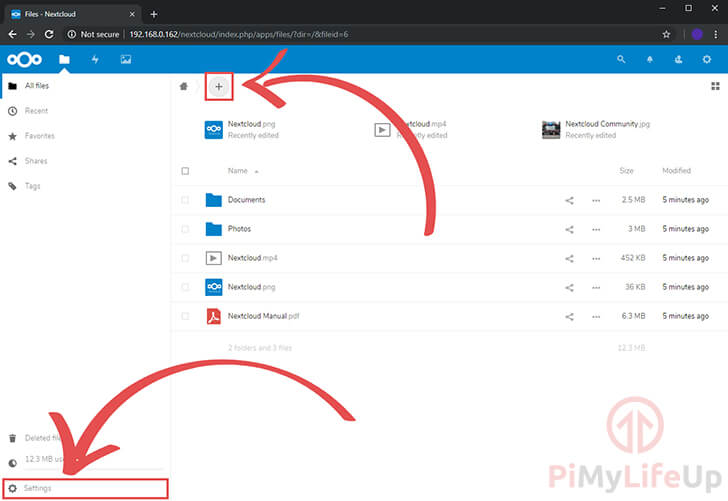
4. Now you can finally see the interface of the Raspberry Pi Nextcloud, you should take some time to familiarize yourself with all the functionality of Nextcloud’s interface.
We won’t go too in depth on how to use the Nextcloud interface, if you need more information then I recommend checking out the support section on nextcloud.
We have however highlighted some of the key areas to check out in the screenshot below.
Moving Nextcloud’s data folder
With Nextcloud now safely installed we can now tweak the setup to both be more secure and a bit more useable. One of the first things we should do is move the data directory so it does not sit in our web accessible directory.
This is also the same way you would move your Nextcloud data directory onto a larger external hard drive rather than putting increased load onto the Raspberry Pi’s SD Card.
1. To get started let’s make our new directory for where we will store our data files.
To make it easy we will make a new folder at /var/nextcloud and move our data folder into there.
Create the folder by running the following command:
sudo mkdir -p /var/nextcloud2. With our new folder we created we will now move our data directory into it, this is easy to do thanks to the mv command.
Please note that your Nextcloud system will be out of action while we move the file then adjust the configuration file.
To begin the move type in the following command:
sudo mv -v /var/www/nextcloud/data /var/nextcloud/data3. Now with the files moved over we can now modify the datadirectory configuration to point to our new directory.
First, let’s change to the config directory for Nextcloud with the following command.
cd /var/www/nextcloud/config4. We can now copy the config file to make a backup of the file, we can do this with the following command:
sudo cp -p config.php config.php.bk5. Finally let’s open up the config.php file for editing using nano.
sudo nano config.php6. Within this file we need to change the following line:
'datadirectory' => '/var/www/nextcloud/data',To
'datadirectory' => '/var/nextcloud/data',7. Now we can save and quit out of the file by pressing CTRL + X then Y and then ENTER.
8. As one last precuation we should make sure that the www-data user still has ownerships over our new folder.
sudo chown -R www-data:www-data /var/nextcloud/dataYou should be able to now refresh your web browser and all your files should be showing exactly as they were previously.
Increasing Nextcloud’s max upload size
By default, PHP has a very low upload limit, so low it’s only 2 MB. To change this, we need to modify the php.ini file and increase the limit. A cloud storage system wouldn’t be very useful if you could only ever upload 2mb files.
1. To get started we need to begin editing the configuration file with the following command:
sudo nano /etc/php/7.3/apache2/php.ini2. Now we need to find and replace the following two lines.
post_max_size = 8M
upload_max_filesize = 2M
To
post_max_size = 1024M
upload_max_filesize = 1024M
Of course, you can set the file size limits to something that is much higher than 20M, so feel free to change that number to whatever you think is the maximum size file you will upload to your Nextcloud.
3. Now we can save and quit out of the file by pressing CTRL + X then pressing Y and then ENTER.
Now we need to restart Apache2 to force it to read in the updated configuration file. We can do that easily with the following command:
sudo service apache2 restart4. You should now be able to restart your web browser and begin a new upload to see that the maximum upload size has been increased successfully.
Setting up SSL for Nextcloud
Now we should really work on setting up your Raspberry Pi Nextcloud server so that it runs through HTTPS and not plain HTTP.
For this tutorial, we will assume that you do not have a domain name, so we will be generating our own self signed certificate and not utilizing one from a free service such as Letsencrypt.
1. Before we go modifying our Apache2 configuration we will first generate the self-signed certificate, luckily, we can do this all in one command thanks to OpenSSL.
Remember that a self-signed certificate will throw errors in your web browser and is not as secure as a properly signed certificate but it is better than nothing. It is also the only option if you’re not utilizing a domain name.
Before we generate the certificate, let’s first make a directory to store it.
sudo mkdir -p /etc/apache2/ssl2. Now let’s generate the certificate itself by running the following command in the terminal:
sudo openssl req -x509 -nodes -days 365 -newkey rsa:4096 -keyout /etc/apache2/ssl/apache.key -out /etc/apache2/ssl/apache.crtIf you want to know exactly what these command arguments do, then read our little description below.
req: This specifies a subcommand for X.509 certificate signing request (CSR) management.
-x509: This option specifies that we want to make a self-signed certificate file instead of generating a certificate request.
-nodes: This tells the openssl application that we don’t want to specify a passphrase, a passphrase will require us to enter it every time Apache is restarted which is painful to deal with.
-days 365: This specifies the amount of days we want the certificate to remain valid for, after this amount of days you will have to generate a new certificate.
-newkey rsa:4096: This will create the certificate request and a new private key at the same time. You will need to do this since we didn’t create a private key in advance. The rsa:2048 tells OpenSSL to generate an RSA key that is 2048 bits long.
-keyout: This parameter names the output file for the private key file that is being created.
-out: This option names the output file for the certificate that we are generating.
After pressing enter you will be presented with the following options to fill out.
Country Name (2 letter code) [AU]:
State or Province Name (full name) [Some-State]:
Locality Name (eg, city) []:
Organization Name (eg, company) [Internet Widgits Pty Ltd]:
Organizational Unit Name (eg, section) []:
Common Name (e.g. server FQDN or YOUR name) []:
Email Address []:
3. Once you have filled out all that information we can then proceed on with setting up Apache2 to run SSL and to also utilize our newly generated certificate. This is a simple process but an important one.
First let’s enable the SSL module for Apache with the following command:
sudo a2enmod ssl4. Now we need to modify the default-ssl.conf file so it will utilize our new certificates and not the default ones that are generated by OpenSSL on installation.
To begin modifying this file run the following command:
sudo nano /etc/apache2/sites-available/default-ssl.conf5. Within this file we need to change the two lines below to point to our new certificates we generated into our /etc/apache2/ssl folder.
Change
SSLCertificateFile /etc/ssl/certs/ssl-cert-snakeoil.pem
SSLCertificateKeyFile /etc/ssl/private/ssl-cert-snakeoil.key
To
SSLCertificateFile /etc/apache2/ssl/apache.crt
SSLCertificateKeyFile /etc/apache2/ssl/apache.key
6. Now we can save and quit out of the file by pressing CTRL + X then pressing Y and then Enter.
7. We can now enable the default-ssl configuration and restart Apache to load in our new configuration. We can do this with the following two commands.
sudo a2ensite default-ssl.conf
sudo service apache2 restart
8. You can test to make sure this is working by going to your Raspberry Pi’s IP address with https:// in front of it. It will give you a warning about it potentially being an invalid certificate. This is normal as it is an unsigned certificate.
For instance to make sure my own copy of Nextcloud is now running behind SSL I would go to the following.
https://192.168.1.105/nextcloudSteps 9, 10, 11 and 12 are all optional and don’t need to be completed.
9. An optional extra step to ensure that you have the best security for your Nextcloud setup is to enforce SSL so no connection can be made over HTTP, if a connection is made it will redirect you to HTTPS.
We can do this by making some changes to our apache configuration, to begin let’s edit the default file with the following command:
sudo nano /etc/apache2/sites-available/000-default.conf10. Replace all the text in this file with the code below. This will basically redirect all HTTP traffic to its HTTPs equivalent.
<VirtualHost *:80>
   ServerAdmin example@example

   RewriteEngine On
   RewriteCond %{HTTPS} off
   RewriteRule ^(.*)$ https://%{HTTP_HOST}$1 [R=301,L]
</VirtualHost>
11. Now we can save and quit out of the file by pressing CTRL + X then pressing Y and then ENTER.
12. Now before this will work we need to enable the redirect module and restart apache. We can easily achieve this by running the following two commands:
sudo a2enmod rewrite
sudo service apache2 restart
Now going to your Raspberry Pi on HTTP should automatically redirect to the HTTPS version. For example, if I go to http://192.168.1.105 it will redirect to https://192.168.1.105
Port Forwarding Nextcloud
Finally, onto the section about port forwarding Nextcloud. We won’t go into too much depth on the ins and outs of port forwarding for your router but we will tell you what ports need forwarding. We will also mention what changes need to be made to Nextcloud for this to work.
Before we get started with this section you need to know that Nextcloud will only operate under specifically specified trusted domains. Which means you will need to either specify a domain name that you want to use for your connection or use your public IP address.
Since most home public IP addresses are dynamic you will need to look into setting up a dynamic DNS service, you will find our tutorial on how to setup a dynamic DNS service for your Raspberry Pi very handy.
1. To add your domain/IP we need to modify NextCloud’s configuration file, we can do that by running the following command:
sudo nano /var/www/nextcloud/config/config.php2. Within this file you will see a block of text like below. This is an array of all trusted domains that you allow Nextcloud to operate through. For now, it should only include your Raspberry Pi’s local IP address. We will add our new domain/IP onto the end of this array.
'trusted_domains' =>
array (
    0 => '192.168.1.105',
),
For our example, we will be adding nextcloud.pimylifeup.com
to the array. This means we need to increment the array ID and add the
domain name. Once you have added a new one it should look something like
below. Repeat this procedure for any new IP’s or domains you want
Nextcloud to be able to operate through.
'trusted_domains' =>
array (
    0 => '192.168.1.105',
    1 => 'nextcloud.pimylifeup.com',
),
3. Now we can save and quit out of the file by pressing CTRL + X then pressing Y and then ENTER.
4. Finally you will need to port forward two ports to finally have Nextcloud up and running. These two ports being Port 80 and Port 443. The protocol required for these is TCP.
Hopefully by now you should have a fully operational Raspberry Pi Nextcloud Server.
If you come across any issues or have some feedback related to this tutorial, then please don’t hesitate to leave a comment below.
Comments
Post a Comment
https://gengwg.blogspot.com/