Introduction
HAProxy, which stands for High Availability Proxy, is a popular open source software TCP/HTTP Load Balancer and proxying solution which can be run on Linux, Solaris, and FreeBSD. Its most common use is to improve the performance and reliability of a server environment by distributing the workload across multiple servers (e.g. web, application, database). It is used in many high-profile environments, including: GitHub, Imgur, Instagram, and Twitter.
In this guide, we will provide a general overview of what HAProxy is, basic load-balancing terminology, and examples of how it might be used to improve the performance and reliability of your own server environment.
HAProxy Terminology
There are many terms and concepts that are important when discussing load balancing and proxying. We will go over commonly used terms in the following sub-sections.
Before we get into the basic types of load balancing, we will talk about ACLs, backends, and frontends.
Access Control List (ACL)
In relation to load balancing, ACLs are used to test some condition and perform an action (e.g. select a server, or block a request) based on the test result. Use of ACLs allows flexible network traffic forwarding based on a variety of factors like pattern-matching and the number of connections to a backend, for example.
Example of an ACL:
acl url_blog path_beg /blog
This ACL is matched if the path of a user's request begins with /blog. This would match a request of http://yourdomain.com/blog/blog-entry-1, for example.
For a detailed guide on ACL usage, check out the HAProxy Configuration Manual.
Backend
A backend is a set of servers that receives forwarded requests. Backends are defined in the backendsection of the HAProxy configuration. In its most basic form, a backend can be defined by:
- which load balance algorithm to use
- a list of servers and ports
A backend can contain one or many servers in it--generally speaking, adding more servers to your backend will increase your potential load capacity by spreading the load over multiple servers. Increase reliability is also achieved through this manner, in case some of your backend servers become unavailable.
Here is an example of a two backend configuration, web-backend and blog-backend with two web servers in each, listening on port 80:
backend web-backend
   balance roundrobin
   server web1 web1.yourdomain.com:80 check
   server web2 web2.yourdomain.com:80 check

backend blog-backend
   balance roundrobin
   mode http
   server blog1 blog1.yourdomain.com:80 check
   server blog1 blog1.yourdomain.com:80 check
balance roundrobin line specifies the load balancing algorithm, which is detailed in the Load Balancing Algorithms section.mode http specifies that layer 7 proxying will be used, which is explained in Types of Load Balancingsection.
The
check option at the end of the server directives specifies that health checks should be performed on those backend servers.Frontend
A frontend defines how requests should be forwarded to backends. Frontends are defined in the frontendsection of the HAProxy configuration. Their definitions are composed of the following components:
- a set of IP addresses and a port (e.g. 10.1.1.7:80, *:443, etc.)
- ACLs
- use_backend rules, which define which backends to use depending on which ACL conditions are matched, and/or a default_backend rule that handles every other case
A frontend can be configured to various types of network traffic, as explained in the next section.
Types of Load Balancing
Now that we have an understanding of the basic components that are used in load balancing, let's get into the basic types of load balancing.
No Load Balancing
A simple web application environment with no load balancing might look like the following:

In this example, the user connects directly to your web server, at yourdomain.com and there is no load balancing. If your single web server goes down, the user will no longer be able to access your web server. Additionally, if many users are trying to access your server simultaneously and it is unable to handle the load, they may have a slow experience or they may not be able to connect at all.
Layer 4 Load Balancing
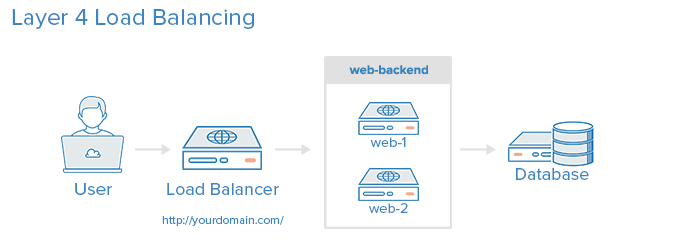
The simplest way to load balance network traffic to multiple servers is to use layer 4 (transport layer) load balancing. Load balancing this way will forward user traffic based on IP range and port (i.e. if a request comes in for http://yourdomain.com/anything, the traffic will be forwarded to the backend that handles all the requests for yourdomain.com on port 80). For more details on layer 4, check out the TCP subsection of our Introduction to Networking.
Here is a diagram of a simple example of layer 4 load balancing:

The user accesses the load balancer, which forwards the user's request to the web-backend group of backend servers. Whichever backend server is selected will respond directly to the user's request. Generally, all of the servers in the web-backend should be serving identical content--otherwise the user might receive inconsistent content. Note that both web servers connect to the same database server.
Layer 7 Load Balancing
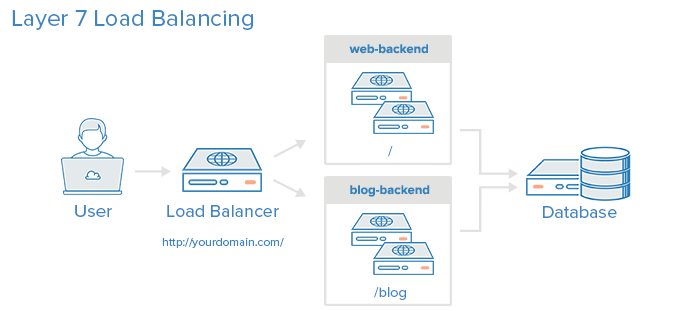
Another, more complex way to load balance network traffic is to use layer 7 (application layer) load balancing. Using layer 7 allows the load balancer to forward requests to different backend servers based on the content of the user's request. This mode of load balancing allows you to run multiple web application servers under the same domain and port. For more details on layer 7, check out the HTTPsubsection of our Introduction to Networking.
Here is a diagram of a simple example of layer 7 load balancing:

In this example, if a user requests yourdomain.com/blog, they are forwarded to the blog backend, which is a set of servers that run a blog application. Other requests are forwarded to web-backend, which might be running another application. Both backends use the same database server, in this example.
A snippet of the example frontend configuration would look like this:
frontend http
  bind *:80
  mode http

  acl url_blog path_beg /blog
  use_backend blog-backend if url_blog

  default_backend web-backend
This configures a frontend named http, which handles all incoming traffic on port 80.
acl url_blog path_beg /blog matches a request if the path of the user's request begins with /blog.use_backend blog-backend if url_blog uses the ACL to proxy the traffic to blog-backend.default_backend web-backend specifies that all other traffic will be forwarded to web-backend.Load Balancing Algorithms
The load balancing algorithm that is used determines which server, in a backend, will be selected when load balancing. HAProxy offers several options for algorithms. In addition to the load balancing algorithm, servers can be assigned a weight parameter to manipulate how frequently the server is selected, compared to other servers.
Because HAProxy provides so many load balancing algorithms, we will only describe a few of them here. See the HAProxy Configuration Manual for a complete list of algorithms.
A few of the commonly used algorithms are as follows:
roundrobin
Round Robin selects servers in turns. This is the default algorithm.
leastconn
Selects the server with the least number of connections--it is recommended for longer sessions. Servers in the same backend are also rotated in a round-robin fashion.
source
This selects which server to use based on a hash of the source IP i.e. your user's IP address. This is one method to ensure that a user will connect to the same server.
Sticky Sessions
Some applications require that a user continues to connect to the same backend server. This persistence is achieved through sticky sessions, using the appsession parameter in the backend that requires it.
Health Check
HAProxy uses health checks to determine if a backend server is available to process requests. This avoids having to manually remove a server from the backend if it becomes unavailable. The default health check is to try to establish a TCP connection to the server i.e. it checks if the backend server is listening on the configured IP address and port.
If a server fails a health check, and therefore is unable to serve requests, it is automatically disabled in the backend i.e. traffic will not be forwarded to it until it becomes healthy again. If all servers in a backend fail, the service will become unavailable until at least one of those backend servers becomes healthy again.
For certain types of backends, like database servers in certain situations, the default health check is insufficient to determine whether a server is still healthy.
Other Solutions
If you feel like HAProxy might be too complex for your needs, the following solutions may be a better fit:
- Linux Virtual Servers (LVS) - A simple, fast layer 4 load balancer included in many Linux distributions
- Nginx - A fast and reliable web server that can also be used for proxy and load-balancing purposes. Nginx is often used in conjunction with HAProxy for its caching and compression capabilities
High Availability
The layer 4 and 7 load balancing setups described before both use a load balancer to direct traffic to one of many backend servers. However, your load balancer is a single point of failure in these setups; if it goes down or gets overwhelmed with requests, it can cause high latency or downtime for your service.
A high availability (HA) setup is an infrastructure without a single point of failure. It prevents a single server failure from being a downtime event by adding redundancy to every layer of your architecture. A load balancer facilitates redundancy for the backend layer (web/app servers), but for a true high availability setup, you need to have redundant load balancers as well.
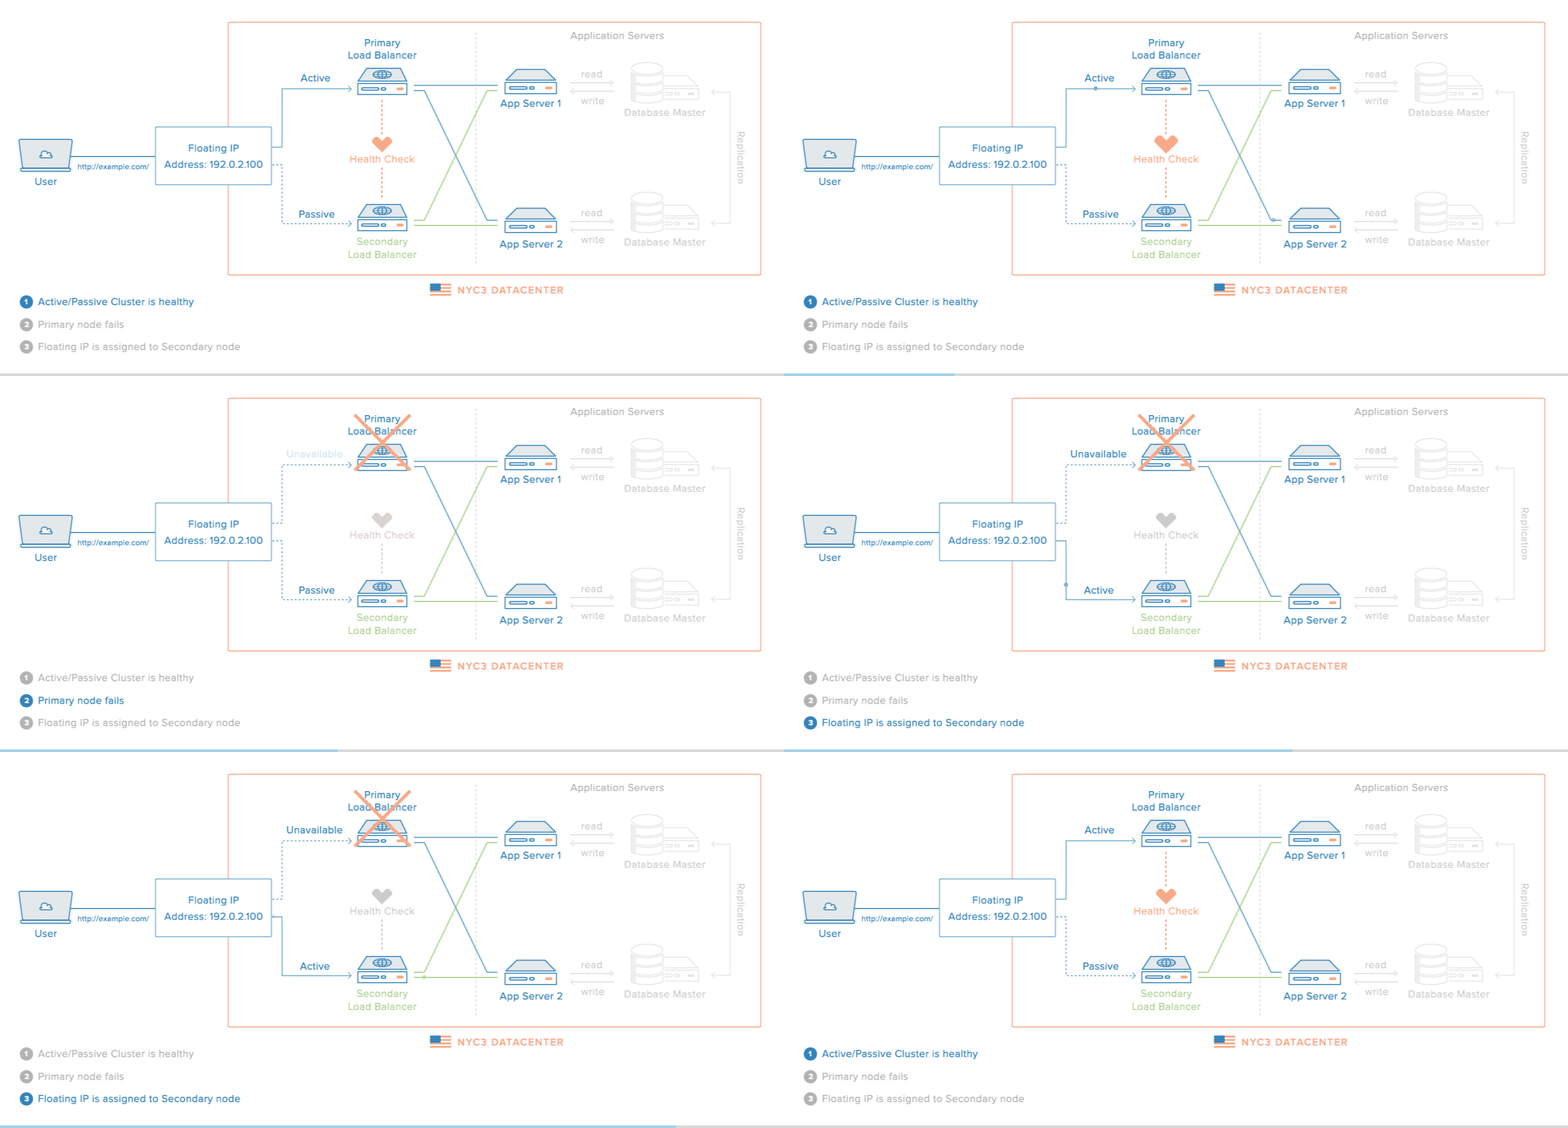
Here is a diagram of a basic high availability setup:

In this example, you have multiple load balancers (one active and one or more passive) behind a static IP address that can be remapped from one server to another. When a user accesses your website, the request goes through the external IP address to the active load balancer. If that load balancer fails, your failover mechanism will detect it and automatically reassign the IP address to one of the passive servers. There are a number of different ways to implement an active/passive HA setup. To learn more, read this section of How To Use Floating IPs.
Conclusion
Now that you have a basic understanding of load balancing and know of a few ways that HAProxy facilitate your load balancing needs, you have a solid foundation to get started on improving the performance and reliability of your own server environment.
The following tutorials provide detailed examples of HAProxy setups:
Comments
Post a Comment
https://gengwg.blogspot.com/