As we’ve learned before, the Address Resolution Protocol (ARP) is the process by which a known L3 address is mapped to an unknown L2 address. The purpose for creating such a mapping is so a packet’s L2 header can be properly populated to deliver a packet to the next NIC in the path between two end points.
The “next NIC” in the path will become the target of the ARP request.
If a host is speaking to another host on the same IP network, the target for the ARP request is the other host’s IP address. If a host is speaking to another host on a different IP network, the target for the ARP request will be the Default Gateway’s IP address.
In the same way, if a Router is delivering a packet to the destination host, the Router’s ARP target will be the Host’s IP address. If a Router is delivering a packet to the next Router in the path to the host, the ARP target will be the other Router’s Interface IP address – as indicated by the relative entry in the Routing table.
ARP Process
The Address Resolution itself is a two step process – a request and a response.
It starts with the initiator sending an ARP Request as a broadcast frame to the entire network. This request must be a broadcast, because at this point the initiator does not know the target’s MAC address, and is therefore unable to send a unicast frame to the target.
Since it was a broadcast, all nodes on the network will receive the ARP Request. All nodes will take a look at the content of the ARP request to determine whether they are the intended target. The nodes which are not the intended target will silently discard the packet.
The node which is the target of the ARP Request will then send an ARP Response back to the original sender. Since the target knows who sent the initial ARP Request, it is able to send the ARP Response unicast, directly back to the initiator.
The entire process is illustrated in this animation:
Notice the ARP Request includes the sender’s MAC address. This is what allows the target (Host B, in this case) to respond directly back to the initiator (Host A).
Now that you understand the general process, let’s take a deeper look at the contents of the ARP Request and ARP Response packets between Host A and Host B.
ARP Request
The ARP Request is an ARP payload carried within the appropriate L2 header for the medium in use. The majority of the time this will be Ethernet, which will also be the L2 medium we will be looking at in our examples.
The Ethernet header will include three fields: a Destination MAC address, a Source MAC address, and an EtherType.
Notice the Layer 2 Destination is
ffff.ffff.ffff, this is the special reserved MAC address indicating a broadcast frame. This is what makes an ARP Request a broadcast. Had Host A chosen to send this frame using a specific host’s MAC address in the destination, then the ARP request would have been unicast.
The Source MAC address is, unsurprisingly, the MAC address of our sender – Host A.
The EtherType contains the hex value
0x0806, which is the reserved EtherType for Address Resolution packets.
This particular Ethernet header also includes some padding. The size of the Destination/Source/Type fields is 14 bytes, the size of the ensuing ARP Payload (pictured below) is 28 bytes, and the size of the trailing FCS (not pictured) is 4 bytes. Which means an additional 18 bytes of padding had to be added to ensure this frame reaches the minimum acceptable length of 64 bytes.
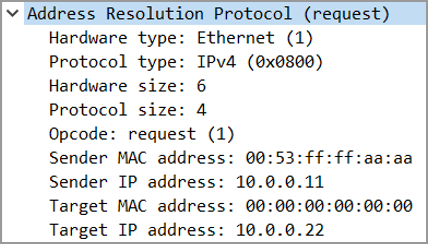
The ARP payload itself has a few fields which are worth discussing.
The Hardware Type and Protocol Type fields indicate what type of addresses are being mapped to each other. In this case, we are mapping an Ethernet address (MAC address) to an IPv4 address.
The Hardware Size and Protocol Size refer to the amount of bytes in each of the aforementioned types of addresses: a MAC address is 6 bytes (or 48 bits), and an IPv4 address is 4 bytes (or 32 bits).
The Opcode indicates what type of ARP packet this is. There are really only two values you will see. A value of
1 indicates this ARP packet is a Request, or a value of 2 would indicates this ARP packet is a Response (visible in the next section).
Finally there are two sets of MAC addresses and IP addresses, which make up the crux of the ARP payload.
The Sender MAC address and Sender IP address are, unsurprisingly, the MAC and IP address of the initiator of the ARP request. In this case, these are the addresses for Host A. Since the Request included the MAC address of Host A, the Response can be sent directly back to Host A, without necessitating a broadcast.
The Target MAC address and Target IP address refer to intended target of the ARP Request – in this case, Host B. Notice the Target IP address is filled in (
10.0.0.22), but the Target MAC address is all zeros. Since Host A does not know Host B’s MAC address, Host A can only populate the Target IP address field and leave the Target MAC address, essentially, blank.
Notice Host B is referred to as the target, and not the destination. This is an important distinction.
The ARP Request’s destination was the broadcast MAC address (
ffff.ffff.ffff). The ARP Request existed for the purpose of resolving Host B’s MAC address, hence the target is Host B.
Consider the target to mean the subject of the ARP conversation. This will make it easier to understand what is going on when we discuss Proxy ARP and Gratuitous ARP in the next articles in this series.
ARP Response
The ARP Response has a very similar packet structure. We will again look at the Ethernet header first, then the ARP payload.
The Ethernet header has the same three parts: a Destination MAC address, a Source MAC address, and an EtherType.
The Destination MAC is Host A — the initial requester, and the Source MAC is Host B — the original target. Notice the frame is addressed directly back to Host A – this is what makes the request unicast.
The EtherType again contains the hex value of
0x0806, to indicate an ARP packet. In addition, the same amount of padding is included in the ARP Response, as the size of the Ethernet Frame and ARP Response is the same as that of the ARP Request.
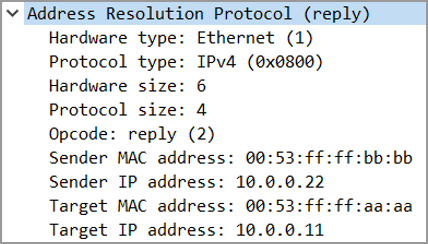
The ARP Response payload contains the same fields as the request above.
Hardware Type and Hardware Size indicate an Ethernet (or MAC) address that is 6 bytes (48 bits).
Protocol Type and Protocol Size indicate an IPv4 address that is 4 bytes (32 bits).
The major difference between the Request and the Response is in the Opcode field. In an ARP Response, this field contains a value of
2.
The Sender MAC and Sender IP Address include the addresses for Host B, which is expected given Host B sent the ARP Response.
The Target MAC and Target IP Address include the addresses for Host A, as this is the target of the ARP Response.
ARP Timing
When the ARP process completes, the information learned is stored in an ARP Table, or ARP Cache. Every device that has an IP address maintains such a table. Entries in this table expire after certain a duration.
Typically, for clients and end hosts, the ARP timeout will be pretty short – typically 60 seconds or less. The reason for this is at the client level, lots of mobility and movement happens, and you don’t want to cache an ARP entry for a very long time.
Whereas for network infrastructure devices (routers, firewalls, etc), the ARP timeout is very long – typically 2-4 hours. The reason for this is at the infrastructure level, the nodes joining and leaving the network should remain pretty consistent. A router is added to the network when it is initially built out, than occasionally as the network scales. Whereas hosts will be added and removed to your network on a day by day basis.
Of course, a Router has no way of knowing whether an entry in its ARP Cache is a host or another infrastructure device. Instead, to keep up with the mobility of clients, a Router’s cache is updated whenever it receives an ARP request.
Which is to say, if a Host is refreshing its default gateway’s ARP mapping every 30~ seconds due to the host’s shorter ARP timing, the default gateway’s ARP mapping of that same host will also be updated every 30 seconds.


Comments
Post a Comment
https://gengwg.blogspot.com/